-
[Tuist] Tuist를 활용하여 SwiftUI 클린 아키텍쳐를 적용한 모듈로 나눈 후 Github에 업로드 하기 1탄iOS Dev 2023. 4. 5. 00:37반응형
2탄 업로드!! 구조 개선 및 소스코드 자동완성 추가! : https://sunrinnote.tistory.com/177
[Tuist] Tuist를 활용하여 SwiftUI 클린 아키텍쳐를 적용한 모듈로 나눈 후 Github에 업로드 하기 2탄!
1탄 : https://sunrinnote.tistory.com/172 [Tuist] Tuist를 활용하여 SwiftUI 클린 아키텍쳐를 적용한 모듈로 나눈 후 Github에 업로드 하기 Tuist라는 툴이 있다. 모듈화, 패키지 의존 관리, 타겟 관리 등등을 지원
sunrinnote.tistory.com
Tuist라는 툴이 있다. 모듈화, 패키지 의존 관리, 타겟 관리 등등을 지원해준다고 한다. <현재 tuist 버전 3.17.0>
Tuist 자체를 소개해주는 블로그는 많이 있으니 건너뛴다. https://nsios.tistory.com/183 https://nsios.tistory.com/195
목표

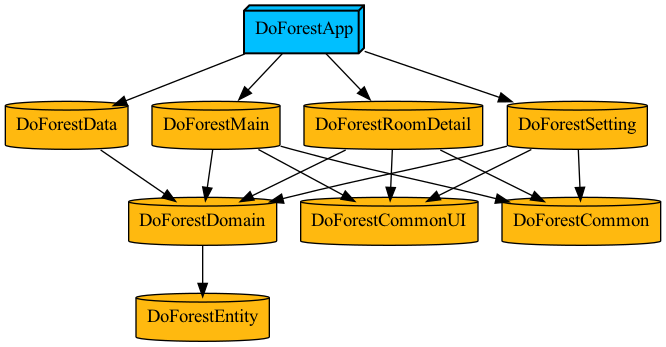
이와 같은 의존성 그래프 형태를 띄는 모듈을 만들 것이다.
DoForestApp
DoForestMain
DoForestSetting
DoForestRoomDetail
DoForestCommon
DoForestCommonUI
DoForestData
DoForestDomain
DoForestEntity총 9개의 모듈을 갖는 프로젝트가 될 것이다.
시작
먼저 tuist를 깔았다는 전제에서 시작한다.
mkdir DoForestTuistTest
cd DoForestTuistTest
tuist init --platform ios --template swiftui

tuist edit
4개의 명령어를 모두 실행하면, Manifests와 Plugins가 나오는 xcode 창이 뜰 것이다.
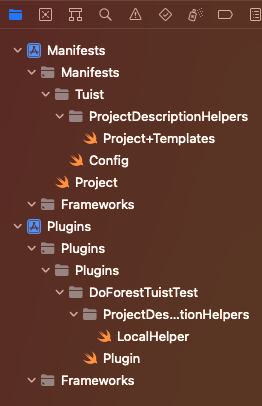
Plugins 부분은 당분간은 안 볼 것이고, Manifests만 볼 것이다.
바로 보이는 Project 파일은 안쓸 것이니 삭제해준다. Config 부분도 가운데 부분을 주석처리 해버리자.
import ProjectDescription

let config = Config(
//    plugins: [
//        .local(path: .relativeToManifest("../../Plugins/DoForest")),
//    ]
)
Project+Templates의 내용을 다음과 같이 정의한다.
import ProjectDescription

/// Project helpers are functions that simplify the way you define your project.
/// Share code to create targets, settings, dependencies,
/// Create your own conventions, e.g: a func that makes sure all shared targets are "static frameworks"
/// See https://docs.tuist.io/guides/helpers/

extension Project {
    /// Helper function to create the Project for this ExampleApp
    public static func app(name: String, platform: Platform, additionalTargets: [String]) -> Project {
        var targets = makeAppTargets(name: name,
                                     platform: platform,
                                     dependencies: additionalTargets.map { TargetDependency.target(name: $0) })
        targets += additionalTargets.flatMap({ makeFrameworkTargets(name: $0, platform: platform) })
        return Project(name: name,
                       organizationName: "yourssu.com",
                       targets: targets)
    }

    // MARK: - Private

    /// Helper function to create a framework target and an associated unit test target
    private static func makeFrameworkTargets(name: String, platform: Platform) -> [Target] {
        let sources = Target(name: name,
                platform: platform,
                product: .framework,
                bundleId: "com.yourssu.\(name)",
                infoPlist: .default,
                sources: ["Targets/\(name)/Sources/**"],
                resources: [],
                dependencies: [])
        let tests = Target(name: "\(name)Tests",
                platform: platform,
                product: .unitTests,
                bundleId: "com.yourssu.\(name)Tests",
                infoPlist: .default,
                sources: ["Targets/\(name)/Tests/**"],
                resources: [],
                dependencies: [.target(name: name)])
        return [sources, tests]
    }

    /// Helper function to create the application target and the unit test target.
    private static func makeAppTargets(name: String, platform: Platform, dependencies: [TargetDependency]) -> [Target] {
        let platform: Platform = platform
        let infoPlist: [String: InfoPlist.Value] = [
            "CFBundleShortVersionString": "1.0",
            "CFBundleVersion": "1",
            "UIMainStoryboardFile": "",
            "UILaunchStoryboardName": "LaunchScreen"
            ]

        let mainTarget = Target(
            name: name,
            platform: platform,
            product: .app,
            bundleId: "com.yourssu.\(name)",
            infoPlist: .extendingDefault(with: infoPlist),
            sources: ["Targets/\(name)/Sources/**"],
            resources: ["Targets/\(name)/Resources/**"],
            dependencies: dependencies
        )

        let testTarget = Target(
            name: "\(name)Tests",
            platform: platform,
            product: .unitTests,
            bundleId: "com.yourssu.\(name)Tests",
            infoPlist: .default,
            sources: ["Targets/\(name)/Tests/**"],
            dependencies: [
                .target(name: "\(name)")
        ])
        return [mainTarget, testTarget]
    }
}
그렇다. 달라진 것은 organization name이랑 bundle ID밖에 없다. 왜냐면 계속 다른 파일에서 이걸 쓸 수가 없어서 그냥 버리고 손으로 하드코딩 하기로 마음을 먹었기 때문이다. 버그인지 버전문제인지 원래 안되는건지 모르겠지만 import랑 dependency 다 확인해도 안되길래 enum으로 자동 정의하는걸 포기하고 그냥 쌩 하드코딩 방식을 택했다. 자동화는 나중에 ^~^
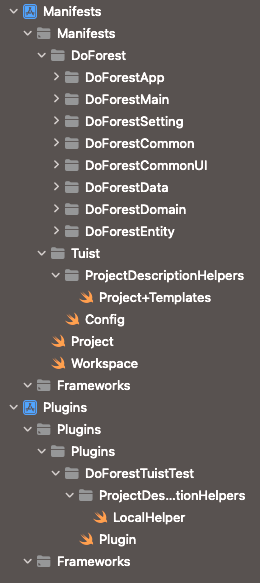
이제 Manifests 그룹에 Workspace.swift를 추가해주자.

내용은 다음과 같이 채운다.
import ProjectDescription


let workspace = Workspace(
    name: "DoForest",
    projects: [
        "DoForest/DoForestApp",
        "DoForest/DoForestMain",
        "DoForest/DoForestSetting",
        "DoForest/DoForestRoomDetail",
        "DoForest/DoForestCommon",
        "DoForest/DoForestCommonUI",
        "DoForest/DoForestData",
        "DoForest/DoForestDomain",
        "DoForest/DoForestEntity",
    ]
)
이제 이 파일들에 해당하는 폴더들을 직접 하나하나 다 만들어주자.처음 DoForest 그룹을 Manifests 그룹 밑에 만들어주고, 생성한 DoForest 그룹 밑에 9개의 그룹을 다시 생성해준다.
이제 각 모듈마다 Project.swift를 추가해준다. 후...
첫번째 예시 코드는 DoForestApp에 추가 한 Project.swift이다.// // Project.swift // ProjectDescriptionHelpers // // Created by 정종인 on 2023/04/03. // import Foundation import ProjectDescription import ProjectDescriptionHelpers let name: String = "DoForestApp" let infoPlist: [String: InfoPlist.Value] = [ "CFBundleShortVersionString": "1.0", "CFBundleVersion": "1", "UIMainStoryboardFile": "", "UILaunchStoryboardName": "LaunchScreen" ] let project = Project(name: name, organizationName: "yourssu.com", targets: [ Target(name: name, platform: .iOS, product: .app, bundleId: "com.yourssu.\(name)", infoPlist: .extendingDefault(with: infoPlist), sources: ["Sources/**"], resources: ["Resources/**"], dependencies: [ TargetDependency.project(target: "DoForestMain", path: .relativeToRoot("DoForest/DoForestMain")), TargetDependency.project(target: "DoForestRoomDetail", path: .relativeToRoot("DoForest/DoForestRoomDetail")), TargetDependency.project(target: "DoForestSetting", path: .relativeToRoot("DoForest/DoForestSetting")), TargetDependency.project(target: "DoForestData", path: .relativeToRoot("DoForest/DoForestData")) ]) ])두번째 예시 코드는 DoForestMain이다.
//
//  Project.swift
//  ProjectDescriptionHelpers
//
//  Created by 정종인 on 2023/04/03.
//

import Foundation
import ProjectDescription
import ProjectDescriptionHelpers

let name: String = "DoForestMain"

let infoPlist: [String: InfoPlist.Value] = [
    "CFBundleShortVersionString": "1.0",
    "CFBundleVersion": "1",
    "UIMainStoryboardFile": "",
    "UILaunchStoryboardName": "LaunchScreen"
]

let project = Project(name: name,
                      organizationName: "yourssu.com",
                      targets: [
                        Target(name: name,
                                platform: .iOS,
                                product: .framework,
                                bundleId: "com.yourssu.\(name)",
                                infoPlist: .extendingDefault(with: infoPlist),
                                sources: ["Sources/**"],
                                resources: ["Resources/**"],
                                dependencies: [
                                    TargetDependency.project(target: "DoForestDomain",
                                                             path: .relativeToRoot("DoForest/DoForestDomain")),
                                    TargetDependency.project(target: "DoForestCommon",
                                                             path: .relativeToRoot("DoForest/DoForestCommon")),
                                    TargetDependency.project(target: "DoForestCommonUI",
                                                             path: .relativeToRoot("DoForest/DoForestCommonUI"))
                                ])
                      ])
그렇다. 이걸 하나하나 한땀한땀 수작업으로 했다. 두 코드의 다른 점은 (1) DoForestApp은 product가 .app으로 되어있고, DoForestMain은 product가 .framework으로 되어있다. 그리고 (2) dependencies 관계가 다르다 : App은 피쳐모듈들에 의존 관계를 갖고 있고, Main은 Domain 등에 의존 관계를 갖고 있다.
혹시 product에 어떤 타입이 있는지 알고싶다면, https://github.com/tuist/tuist/blob/6a5c00c98111612b79b6837bd4b37b0ded7cc130/Sources/TuistGraph/Models/Product.swift#L3 깃허브에 직접 가서 보는 방법밖에 없는 것 같다.중간에 dependencies에도 자동완성이 안되어서 한땀한땀 추가해준걸 볼 수 있다. 이 문장 하나가 나중에 완성될 graph에 화살표를 뜻한다고 생각하면 된다. DoForestApp은 DoForestMain 등 총 4개의 모듈에 의존 관계를 가지고 있다고 할 수 있다.
infoPlist는 launch screen 정보가 없으면 화면이 이상하게 나온다. 그거 때문에 모두 추가해주어야 한다. 중요!!
또 중간에 보면 sources와 resources 폴더를 넣어주었다. 그럼.. 추가 해줘야겠지?
근데 블로그 보면서 하나같이 sources와 resources 폴더 추가해준 스샷이 많이 없던데 이유를 알았다. 이 창을 나갔다가 다시 tuist edit으로 돌아오면 각 모듈 안에 Project.swift 빼고 다 포함이 안되어있다.. (정상적으로 추가는 되어있긴 하다) 굳이 가져오고 싶으면 해당 모듈 우클릭 하고 Add files to Manifests를 선택한다. copy item if needed 체크를 빼고, Create Groups로 선택하여 add한다.

어쨌든 다 한땀한땀 모든 모듈에 대해 저 두 폴더를 추가했다. 근데 주의할 점은 이렇게 폴더만 덩그러니 냅두면 나중에 git에 추가할 때 폴더가 안올라간다. 이렇게 폴더가 없으면 clone 받아서 실행할 때 tuist generation 오류가 생긴다. 그럼 어떻게 해야할까?
빈 폴더를 깃에 추가하고 싶으면 .gitkeep이라는 꼼수를 사용해야 한다. 방법은 간단하다. 터미널에서 깃에 추가하고싶은 폴더로 cd해서 들어간 다음 touch .gitkeep 명령어로 파일을 만든다. 이게 끝이다. 이걸 소스코드를 안집어넣는 모든 폴더에 적용시키면 나중에 폴더 자체를 커밋할 수 있다. 반대로 말하면? 이걸 안해주면 빈 폴더를 커밋할 수 없고, 나중에 깃허브에 아무것도 없는 것을 확인할 수 있다. 클론 받아서 절망을 맛보기 전에 작업해두자.오타 없이 잘 작업했으면 모두 cmd + w로 하나하나 잘 닫아준 다음 tuist edit을 ctrl+c로 종료하고 다음 명령어를 순서대로 입력하자.
tuist clean
tuist fetch
tuist generate
프로젝트가 잘 생성되는 것을 볼 수 있다. (중간에 소스 코드들은 미리 tuist edit 단계에서 추가해주었다.)
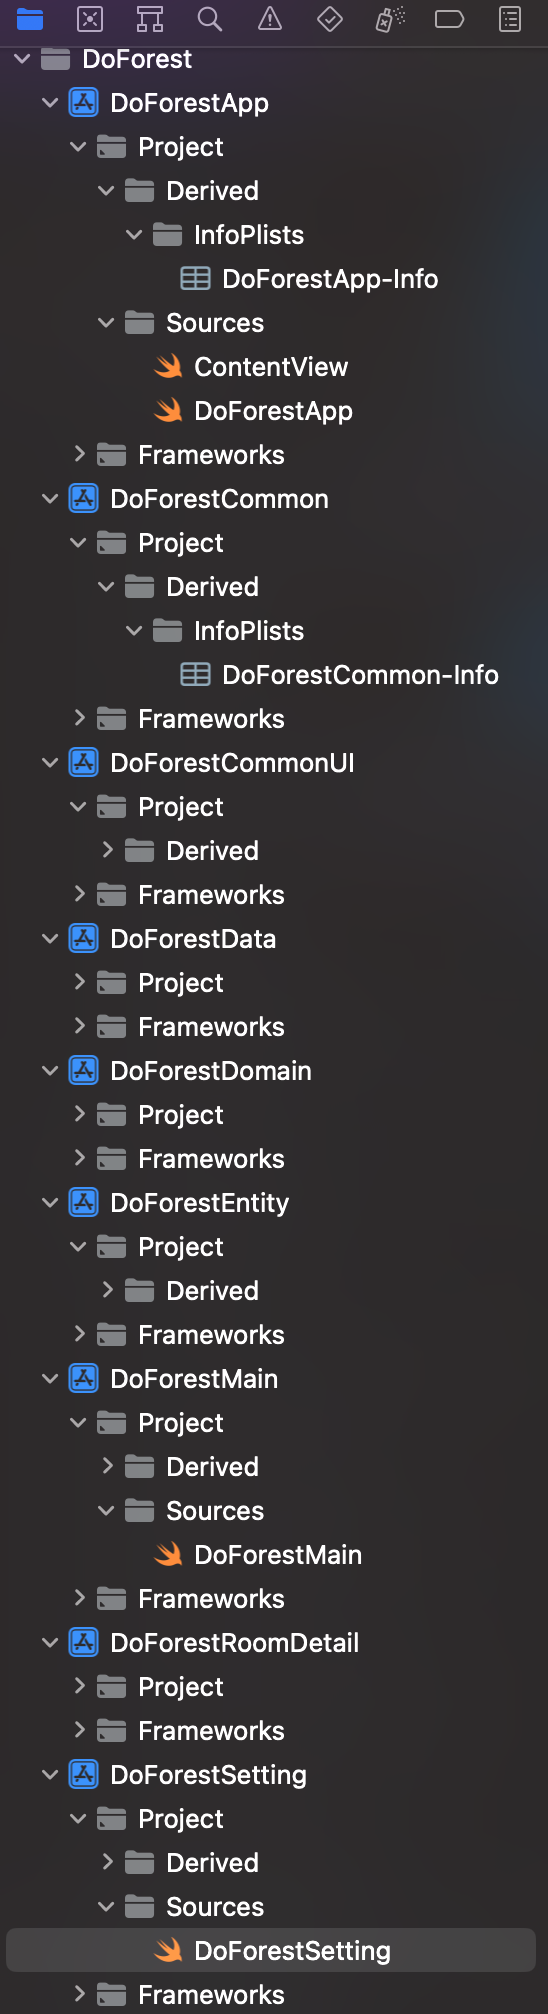
추가로, 폴더 안에 Targets 폴더가 있는데 이제 안쓰니 지워주자.
tuist graph이 명령어는 depencency 그래프를 그려준다. 초기 설치가 살짝 오래 걸리니 미리 해두자. 완성된 그래프 파일은 프로젝트 폴더 내부에 생기며, 우리가 원했던 것과 일치하게 잘 그려주었다.
프로그램 실행시키기
자동으로 추가된 타겟들 중에서 우리는 App 모듈 먼저 선택해서 실험해보겠다.
Sources 폴더 안에 ContentView랑 DoForestApp 파일을 만들어주고, 내용을 다음과 같이 채워주자.// // DoForestApp.swift // ProjectDescriptionHelpers // // Created by 정종인 on 2023/04/04. // import SwiftUI @main struct DoForestApp: App { var body: some Scene { WindowGroup { ContentView() } } }// // ContentView.swift // ProjectDescriptionHelpers // // Created by 정종인 on 2023/04/04. // import SwiftUI import DoForestMain struct ContentView: View { var body: some View { VStack { Text("Hello World!") DoForestMain() } } } struct ContentView_Previews: PreviewProvider { static var previews: some View { ContentView() } }DoForestMain() 을 불러오는데, 이는 DoForestMain 모듈 안에 있다. import로 모듈을 추가해주고, DoForestMain 모듈로 가서 소스코드를 추가해주자.
//
//  DoForestMain.swift
//  ProjectDescriptionHelpers
//
//  Created by 정종인 on 2023/04/04.
//

import SwiftUI

public struct DoForestMain: View {
    public var body: some View {
        Text("Hello, World! from Main!")
    }
    public init() {}
}

struct DoForestMain_Previews: PreviewProvider {
    static var previews: some View {
        DoForestMain()
    }
}
좋다. 이제 깃에 올려보자.
Github에 tuist로 모듈화 한 내용 올리기
먼저, 이 내용을 이해하려면 CLI 로 깃을 다룰 줄 알아야 한다.
본격적으로 시작하기 전에 만약 각 모듈에 .git 디렉토리가 있다면 모두 제거해주어야 한다. 숨김 폴더를 보는 방법은 (1) ls -al (2) 파인더에서 Shift + Command + .
프로젝트의 가장 상위 폴더에 git init을 한 다음 모든 내용을 stage -> commit을 해두자.
github으로 가서 레포지토리를 새로 판다. 아무것도 추가하지 않은 상태로 (readme, license 다 추가 X) 레포를 만들면 해당 레포지토리를 remote할 수 있는 주소가 나온다. 그걸 이용해서 우리 프로젝트 폴더에 git remote add origin 해당주소 이걸 해주면 이게 push가 가능하다. 바로 push 해주면, 깃헙에 다 올라간다. .gitignore에 프로젝트 파일들이 빠져있어서, 클론 받는 다른 유저들은 해당 프로젝트를 받아서 tuist clean -> tuist fetch -> tuist generate 명령을 쳐야한다. 근데 일일히 다 치기 귀찮지 않은가? Makefile을 하나 만들어주자.
<Makefile>
start:
	tuist clean
	tuist fetch
	tuist generate
make start 혹은 make 명령어만 입력하면 쭉 다 실행이 된다. 편리하다! 이것도 깃에 추가해준다.
지금까지의 작업 내용을 모두 git에 올려두는 것 까지 성공했고, 이제 협업 시작이다.
안타깝게도 private으로 관리하려고 해서, 지금까지의 작업 내용만 담은 zip파일을 올려둔다.
매우 비효율적이지만 한번 하드코딩 해보는것도 나쁘지 않은 경험인 것 같다. 왜 쓰는지 조금은 알 것 같다. tuist, swiftUI, 클린 아키텍쳐, 모듈화, Github 배포를 모두 한번에 담은 블로그가 없어서 아쉬웠다. 자동화 템플릿 관련해서는 https://ios-development.tistory.com/1302 을 참고하면 될 것 같다.
2탄 업로드!! 구조 개선 및 소스코드 자동완성 추가! : https://sunrinnote.tistory.com/177
[Tuist] Tuist를 활용하여 SwiftUI 클린 아키텍쳐를 적용한 모듈로 나눈 후 Github에 업로드 하기 2탄!
1탄 : https://sunrinnote.tistory.com/172 [Tuist] Tuist를 활용하여 SwiftUI 클린 아키텍쳐를 적용한 모듈로 나눈 후 Github에 업로드 하기 Tuist라는 툴이 있다. 모듈화, 패키지 의존 관리, 타겟 관리 등등을 지원
sunrinnote.tistory.com
반응형'iOS Dev' 카테고리의 다른 글
Apple Developer Academy @ POSTECH 3기 합격 후기 (1) 2023.07.20 마이크로피처 아키텍처란? (µFeatures Architecture) (1) 2023.07.15 [Tuist] Tuist를 활용하여 SwiftUI 클린 아키텍쳐를 적용한 모듈로 나눈 후 Github에 업로드 하기 2탄! (0) 2023.05.07 iOS 엔지니어링 '잘' 하기 (feat. 클린 아키텍쳐) (2) 2023.03.25 UITableViewCell에 Button을 올렸는데 터치 자체가 안될 때 (0) 2022.08.08